In my previous posts I have explained how to use mouse and keyboard inputs to control the game, but in addition to that, Pygame includes support for various controllers including console controllers like playstation, xbox and switch.
In this tutorial I will explain how to setup joysticks in pygame and how to take inputs from the various buttons. For this I will use a playstation 4 controller, but the logic applies to the other controllers.
Setting Up The Joystick
There are a couple initial setup steps before using the joystick in pygame. First the joystick module must be initialised:
					#initialise the joystick module
pygame.joystick.init()
Then we create joystick objects. This allows us to register each connected joystick and take their inputs separately. To do this, we use one of a few joystick events, JOYDEVICEADDED.
I’ll define an empty list to store the joysticks (since there could be more than one connected at once).
joysticks = []
Then I use the event handler to check if a new controller has been added.
If it has, then I create a joystick object on line 4 and add it to the list. The event.device_index assigns a value to the joystick. If there is more than 1 joystick connected, each will have a different index so they can be controlled separately.
					  #event handler
  for event in pygame.event.get():
    if event.type == pygame.JOYDEVICEADDED:
      joy = pygame.joystick.Joystick(event.device_index)
      joysticks.append(joy)
If you have a joystick connected before you launch your game, this event will still be triggered and the joystick will be added correctly to the list.
If you’d like to follow along from this point, the starter code is below.
Line 21 creates a helper function for displaying text on the screen. I have covered this in a previous tutorial so won’t explain again here.
I then create a player rectangle on line 35 and draw it on the screen on line 51. For now this doesn’t do anything but I’ll come to it further down.
					import pygame

pygame.init()

#initialise the joystick module
pygame.joystick.init()

#define screen size
SCREEN_WIDTH = 800
SCREEN_HEIGHT = 500

#create game window
screen = pygame.display.set_mode((SCREEN_WIDTH, SCREEN_HEIGHT))
pygame.display.set_caption("Joysticks")

#define font
font_size = 30
font = pygame.font.SysFont("Futura", font_size)

#function for outputting text onto the screen
def draw_text(text, font, text_col, x, y):
  img = font.render(text, True, text_col)
  screen.blit(img, (x, y))

#create clock for setting game frame rate
clock = pygame.time.Clock()
FPS = 60

#create empty list to store joysticks
joysticks = []

#create player rectangle
x = 350
y = 200
player = pygame.Rect(x, y, 100, 100)

#define player colour
col = "royalblue"

#game loop
run = True
while run:

  clock.tick(FPS)

  #update background
  screen.fill(pygame.Color("midnightblue"))

  #draw player
  player.topleft = (x, y)
  pygame.draw.rect(screen, pygame.Color(col), player)

  #event handler
  for event in pygame.event.get():
    if event.type == pygame.JOYDEVICEADDED:
      joy = pygame.joystick.Joystick(event.device_index)
      joysticks.append(joy)
    #quit program
    if event.type == pygame.QUIT:
      run = False

  #update display
  pygame.display.flip()

pygame.quit()
Getting Joystick Data
The joystick module includes a number of different methods and events, which allow us to get information from the joystick and take button inputs and I’ll cover some of them below:
.get_count()returns the number of connected joysticks..get_power_level()will approximately determine the joystick battery level.-
.get_name()determines the type of joystick that is connected (Playstation 4, Xbox 360, etc). .get_numaxes()returns the number of axes that the joystick can control.
Let’s see how this looks in code:
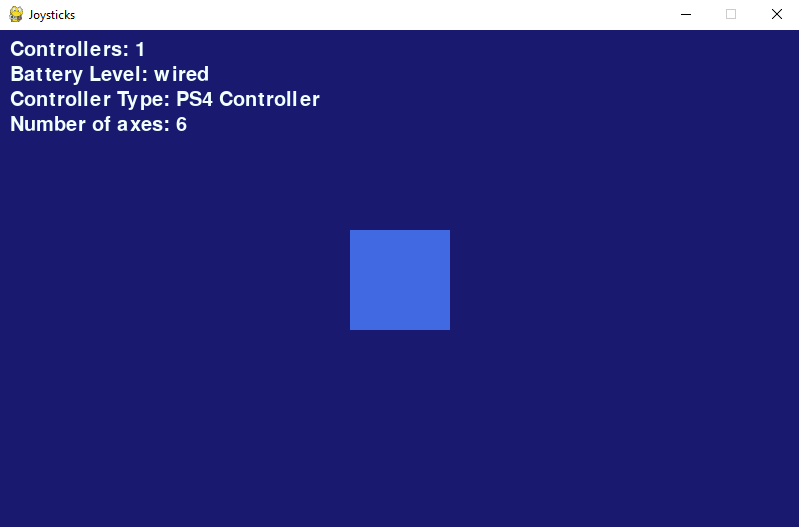
					  #show number of connected joysticks
  draw_text("Controllers: " + str(pygame.joystick.get_count()), font, pygame.Color("azure"), 10, 10)
  for joystick in joysticks:
    draw_text("Battery Level: " + str(joystick.get_power_level()), font, pygame.Color("azure"), 10, 35)
    draw_text("Controller Type: " + str(joystick.get_name()), font, pygame.Color("azure"), 10, 60)
    draw_text("Number of axes: " + str(joystick.get_numaxes()), font, pygame.Color("azure"), 10, 85)
This is the output when connecting my sixaxis PS4 controller:
Getting Input From Joystick Buttons
Of course the main part of using a joystick for a game is to be able to take input from the various buttons. This is where that rectangle from before comes in.
Similar to keyboard and mouse inputs, there are two options for taking inputs from the joystick:
- Using
JOYBUTTONDOWN&JOYBUTTONUPevents. - Taking direct button input using
.get_button()
I prefer taking direct input rather than using the event handler so I’ll use that method here. If you’d like to learn more about the difference between using the event handler and taking direct key/mouse/joystick input, have a look at this guide.
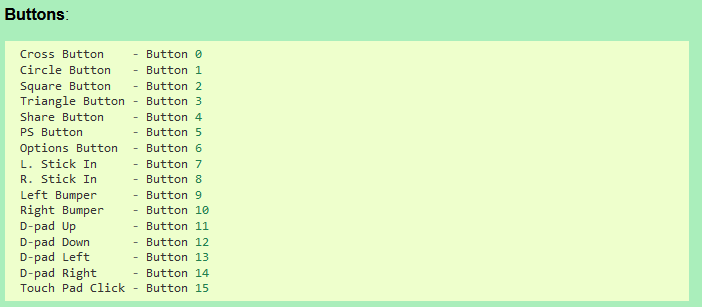
Joystick Button Assignments
Each joystick button is assigned a button number. The list below is taken from pygame’s documentation and applies to the Playstation 4 controller.
To check buttons specific to your controller, have a look at the documentation here.
Changing Rectangle Colour With Joystick Buttons
I’ll begin with the four right hand side buttons, the cross, circle, square and triangle and I will use these to change the colour of the rectangle in our game.
The colour is controlled by the col variable, so I change this when a specific button is detected.
					for joystick in joysticks:
  #change player colour with buttons
  if joystick.get_button(0):
    col = "royalblue"
  if joystick.get_button(1):
    col = "crimson"
  if joystick.get_button(2):
    col = "fuchsia"
  if joystick.get_button(3):
    col = "forestgreen
In the above code, I iterate through the joysticks list to go through each joystick individually. Then check for button presses with .get_button() and update the colour of the rectangle accordingly. You can see the result below:
Moving The Player With The Joystick D Pad
The above button check can also be applied to the D pad to move the player rectangle around the screen. The button numbers are again taken from the pygame documentation and are 11 – 14.
In the same for loop from before, we add the following code. This updates the x and y variables using the D pad buttons, which then re-positions the player rectangle.
					    #player movement with joystick
    if joystick.get_button(14):
      x += 5
    if joystick.get_button(13):
      x -= 5
    if joystick.get_button(11):
      y -= 5
    if joystick.get_button(12):
      y += 5
You should now be able to move the rectangle about the screen with the D pad
Moving The Player With The Joystick Analogue Sticks
One of the features of using a joystick is that you can use the analogue sticks to give adjustable inputs. While the D pad buttons are either on or off, the analogue sticks can give different values depending on how far you push them, allowing us to adjust the speed at which the rectangle moves.
The analogue stick input isn’t taken in the same way as buttons though, so we can’t use .get_button(). Instead we use the axis input shown below from the pygame documentation.

Left and right is on axis 0 and up and down is on axis 1 so I take the two inputs separately and store them in their own variables.
In the same for loop from before, we add the following code.
					    #player movement with analogue sticks
    horiz_move = joystick.get_axis(0)
    vert_move = joystick.get_axis(1)
If you print those variables out and move around the left analogue stick, you will see the values quickly changing ranging from -1 to + 1 for both horizontal and vertical movement.
We can use this to move the rectangle about. Since the max value in these variables is 1, I multiply that by 5 to increase the movement speed.
					y += vert_move * 5
x += horiz_move * 5
You can now see that the movement speed can be controlled depending on how far you move the analogue stick, which gives you much more control over the rectangle in the game.
There is one small issue with this method though, which is that the analogue sticks don’t always return back to zero when you release them, so even when not holding the analogue sticks, the rectangle might continue to slowly move.
To fix this, we can ignore very small values from the analogue stick so the rectangle only moves when the analogue stick is definitely being pushed. If the value is above 0.05, then we will move the rectangle, otherwise we’ll ignore it.
The analogue movement code becomes:
					    #player movement with analogue sticks
    horiz_move = joystick.get_axis(0)
    vert_move = joystick.get_axis(1)
    if abs(vert_move) > 0.05:
      y += vert_move * 5
    if abs(horiz_move) > 0.05:
      x += horiz_move * 5
Conclusion And Complete Code
There are other buttons on the joystick that I haven’t taken input for, but the logic for them is the same as the digital and anlogue buttons that I have already covered, so you can have a go at adding them yourself as an exercise.
The final code for this tutorial is below:
					import pygame

pygame.init()

#initialise the joystick module
pygame.joystick.init()

#define screen size
SCREEN_WIDTH = 800
SCREEN_HEIGHT = 500

#create game window
screen = pygame.display.set_mode((SCREEN_WIDTH, SCREEN_HEIGHT))
pygame.display.set_caption("Joysticks")

#define font
font_size = 30
font = pygame.font.SysFont("Futura", font_size)

#function for outputting text onto the screen
def draw_text(text, font, text_col, x, y):
  img = font.render(text, True, text_col)
  screen.blit(img, (x, y))

#create clock for setting game frame rate
clock = pygame.time.Clock()
FPS = 60

#create empty list to store joysticks
joysticks = []

#create player rectangle
x = 350
y = 200
player = pygame.Rect(x, y, 100, 100)

#define player colour
col = "royalblue"

#game loop
run = True
while run:

  clock.tick(FPS)

  #update background
  screen.fill(pygame.Color("midnightblue"))

  #draw player
  player.topleft = (x, y)
  pygame.draw.rect(screen, pygame.Color(col), player)

  #show number of connected joysticks
  draw_text("Controllers: " + str(pygame.joystick.get_count()), font, pygame.Color("azure"), 10, 10)
  for joystick in joysticks:
    draw_text("Battery Level: " + str(joystick.get_power_level()), font, pygame.Color("azure"), 10, 35)
    draw_text("Controller Type: " + str(joystick.get_name()), font, pygame.Color("azure"), 10, 60)
    draw_text("Number of axes: " + str(joystick.get_numaxes()), font, pygame.Color("azure"), 10, 85)

  for joystick in joysticks:
    #change player colour with buttons
    if joystick.get_button(0):
      col = "royalblue"
    if joystick.get_button(1):
      col = "crimson"
    if joystick.get_button(2):
      col = "fuchsia"
    if joystick.get_button(3):
      col = "forestgreen"

    #player movement with joystick
    if joystick.get_button(14):
      x += 5
    if joystick.get_button(13):
      x -= 5
    if joystick.get_button(11):
      y -= 5
    if joystick.get_button(12):
      y += 5

    #player movement with analogue sticks
    horiz_move = joystick.get_axis(0)
    vert_move = joystick.get_axis(1)
    if abs(vert_move) > 0.05:
      y += vert_move * 5
    if abs(horiz_move) > 0.05:
      x += horiz_move * 5

  #event handler
  for event in pygame.event.get():
    if event.type == pygame.JOYDEVICEADDED:
      joy = pygame.joystick.Joystick(event.device_index)
      joysticks.append(joy)
    #quit program
    if event.type == pygame.QUIT:
      run = False

  #update display
  pygame.display.flip()

pygame.quit()
Really awesome tutorial Russ.
Thank you!